ELEC
480
HSPICE Instructions
Fall 2005 Edition
Note:
if you have trouble accessing any files or running the code,
please let the T.A. know via email (davej{at}ece.ubc.ca)
1.
Paths
Check your .cshrc.solaris file in your home directory to ensure
that it contains the following:
# hspice source
source /CMC/tools/meta/bin/cshrc.meta
2. Directories
HSpice does not require you to create any special directories. However,
when HSpice is executed it does generate several temporary and output
files, which are placed in whatever directory you called the hspice
command from. Therefore, in the interest of keeping files for different
assignments/projects organized, it is recommended that you create separate
directories for each assignment and run HSpice within it.
3. Documentation
The HSpice documents can be found in the folder:
/CMC/tools/hspice/2003.03-SP1/docs
The
most important one is the Hspice Manual, which can be accessed by typing:
acroread /CMC/tools/hspice/2003.03-SP1/docs/HSPICE_App_Manual.pdf
&
4. HSpice Deck
Hspice input is given in the form of a script file, often called an
Hspice Deck, that contains
commands for your circuit's description and analysis (DC, AC, transient,
etc.). To create your deck, use any simple text editor that you are
comfortable with. On the departement Unix network, you can use emacs,
vi, or textedit. On Windows machines you can use Notepad,
but do not use MS-Word or similar! For HSpice syntax, refer to the HSpice
manual (see section 3 above).
A
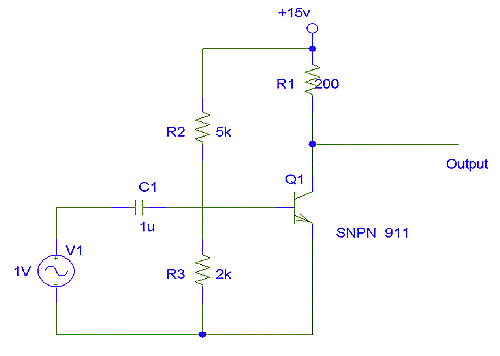
sample Hspice deck follows for a simple inverting amplifier circuit
using a BJT transistor.

***********************************************************************
* bjtamp.hsp
* Simple inverting amplifier
***********************************************************************
***********************************************************************
*Set supply and library
***********************************************************************
.protect
* Don't print the contents of library
*
GA911 library file
.include '/nfs/kelowna/CMC/kits/ga911/cadence/ga911.2.2/models/hspice/nnn'
.unprotect
* Resume printing SPICE deck
.options post ingold=2
***********************************************************************
*Define power supply
***********************************************************************
Vsup Vcc Gnd 15
***********************************************************************
*Top level simulation netlist
***********************************************************************
Q1 Col1 Bas1 Gnd
Gnd snpn_911
RCol1 Vcc Col1 200
Rb1 Vcc Bas1 5k
Rb2 Bas1 Gnd 2k
Cin1 Bas1 netb 1u
***********************************************************************
*Stimulus
***********************************************************************
Vsig netb Gnd SIN (0 1 1k)
***********************************************************************
*Simulation
***********************************************************************
.tran 1u 0.01
***********************************************************************
*End of Deck
***********************************************************************
.end
***********************************************************************
5.
Executing HSpice
To run Hspice use the command:
hspice
myhspicedeckname.hsp
where myhspicedeck.hsp is your deck (from step 4 above)
After running the hspice command, you should see (unless you
have suppressed output to the screen) the steps HSpice takes as it "compiles"
your deck. At the end, there should be a line that says one of the following:
***** hspice job concluded
which means your file ran without problems (their might be warnings,
however), or...
***** hspice job aborted
which means there was an error in execution (scroll up the terminal
window to find it, and then modify your deck file accordingly).
6. Viewing Results with Awaves
Awaves is the graphical waveform viewer supplied with Hspice. Some of
the HSpice output files that can be viewed with it are (the $ sign represents
an integer: 0, 1, 2...):
myhspicedeck.st$,
myhspicedeck.ac$, myhspicedeck.tr$
To
run Awaves use the command:
awaves
deckname.st0 &
The Awaves program window will open along with a Results Browser
window. At the very top of the latter, you should see Design: /???/myusername/mydirectory/myhspicedeck.
Directly below it, there should be at least one line representing your
results - clicking on it once will bring up the simulation results from
your deck (this is the purpose of the .options post line in the deck).
Under Types, you can choose voltages or currents, thereby changing
the content under Curves (the names there represen nodes, wires,
etc in your circuit. Double-click on a value in Curves to display
the corresponding results in the main Awaves window.
Last
modified on
August 11, 2005
Created by Michael Leslie and Leonardo Castro
|
